
| 일 | 월 | 화 | 수 | 목 | 금 | 토 |
|---|---|---|---|---|---|---|
| 1 | 2 | 3 | 4 | 5 | 6 | 7 |
| 8 | 9 | 10 | 11 | 12 | 13 | 14 |
| 15 | 16 | 17 | 18 | 19 | 20 | 21 |
| 22 | 23 | 24 | 25 | 26 | 27 | 28 |
- Github
- 선형회귀
- Python
- version_error
- MachineLearning
- SQL #python #MySQL #PostgreSQL
- git
- AI #Inductive_Bias #Relational_inductive_bias
- SQL #PostgreSQL
- aiohttp
- 파이썬
- python #pandas #data_preprocessing #data_process
- 시계열데이터
- fashionmnist
- mnist
- tensorflow #tensorflow-gpu #python #ubuntu #텐서플로우
- ngrok
- AI #RNN #LSTM #LSTMP #인공지능 #언어학습 #순차학습
- Asyncio
- 판다스 #Pandas #DataFrame #Statistics #통계 #파이썬 #Python #Resample
- pandas #python #excel #판다스 #파이썬 #엑셀저장 #xlsxwriter
- tf.where
- pandas #python #date #datetime
- pandas #ewma #python #지수이동가중평균 #파이썬 #판다스 #ema #ewm
- 비동기모듈
- 깃허브
- TensorFlow
- REST_API
- 특정값지우기
- 깃
- Today
- Total
린스토리
[Tensorflow v.2] Tutorial_Classification(분류) 문제 다루기 본문
[Tensorflow v.2] Tutorial_Classification(분류) 문제 다루기
rinaaaLee 2022. 7. 7. 16:42Tensorflow 공식 홈페이지에서는 다양한 예제를 제공해준다.
이러한 예제들을 직접 따라 해보면서 tensorflow 사용하는 법과 각종 AI 이론을 공부해보고자 한다.
첫번째로는, "Basic Classification: Classify images of clothing"의 주제를 가지고 해보고자 한다.
Intro
Dataset : Fashion MNIST
Problem : Classification
Model : DNN / CNN
Main
1. Import Library
import tensorflow as tf
import numpy as np
import matplotlib.pyplot as plt

print(tf.__version__)
2. Import the Fashion MNIST dataset
MNIST dataset은 많이 들어봤을 것이다. 0~9 숫자로 이루어진 데이터셋으로, 28X28의 간단하게 모델 테스트하기에 좋은 데이터셋이다. Fasion MNIST는 10개의 패션 카테고리로 이루어진 70,000장의 흑백 패션 이미지 데이터셋이다. 이 데이터셋도 row resolution(28X28)으로 되어있다.

위 그림처럼 이루어져 있고, 총 70,000장 중에 60,000장은 train dataset으로, 10,000장은 test dataset으로 사용할 것이다.
데이터 로드를 해보자.
tensorflow > keras > datsets는 유명한 데이터셋을 지원해준다.
Module >> tf.keras.datasets
boston_housing : Boston housing price regression dataset.
cifar10 : CIFAR 10 small images classification dataset.
cifar100 : CIFAR 100 small images classification dataset.
fashion_mnist : Fashion_MNIST dataset.
imdb : IMDB sentiment classification dataset.
mnist : MNIST handwritten digits dataset.
reuters : Reuters topic classification dataset.
fashion_mnist = tf.keras.datasets.fashion_mnist
(train_images, train_labels), (test_images, test_labels) = fashion_mnist.load_data()
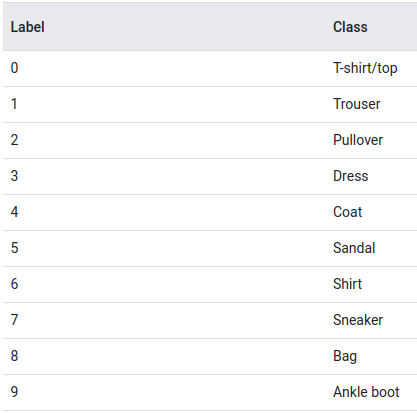
class_names = ['T-shirt/top', 'Trouser', 'Pullover', 'Dress', 'Coat',
'Sandal', 'Shirt', 'Sneaker', 'Bag', 'Ankle boot']3. Explore the Data
print(train_images.shape)
print(len(train_labels))
print(test_images.shape)
print(len(test_labels))
4. Preprocess the Data
데이터를 모델에 넣어 train하기 전에 가공해주는 단계가 필요하다. 우선, 데이터를 봐보자.
plt.figure()
plt.imshow(train_images[0])
plt.colorbar()
plt.grid(False)
plt.show()
이미지 데이터가 0~255 범위의 픽셀로 되어있음을 확인했다. 이를 0~1로 scale down을 해보자.
여기서 중요한 것은, Train dataset을 scale 변환해주었다면 Test dataset도 동일하게 적용해줘야 한다.
train_images = train_images / 255.0

test_images = test_images / 255.0
변환 후 이미지가 어떻게 변했는지 확인해보자.
plt.figure(figsize=(10,10))
for i in range(25):
    plt.subplot(5,5,i+1)
    plt.xticks([])
    plt.yticks([])
    plt.grid(False)
    plt.imshow(train_images[i], cmap=plt.cm.binary)
    plt.xlabel(class_names[train_labels[i]])
plt.show()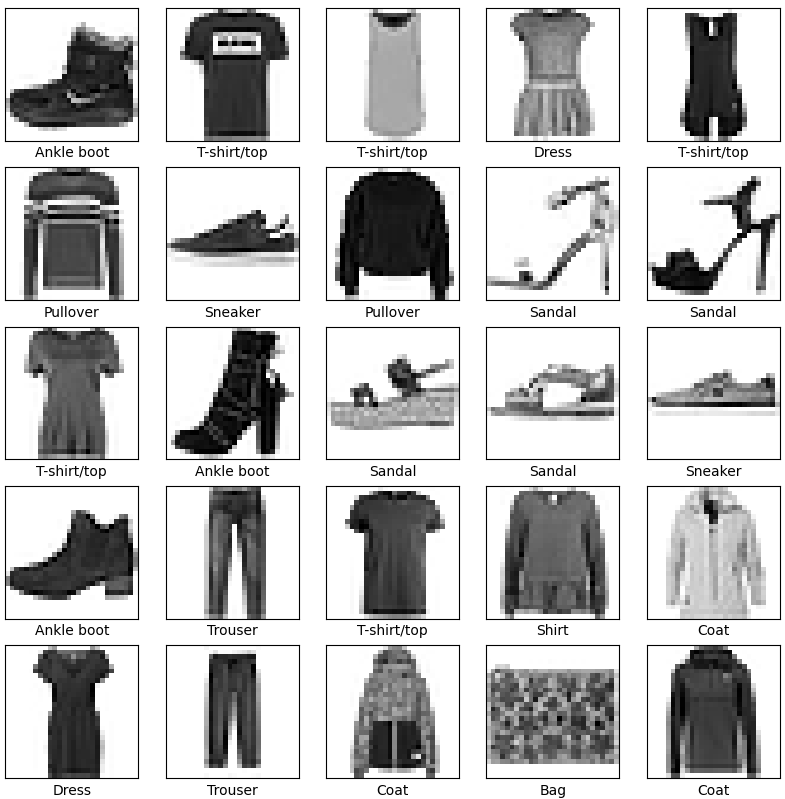
0~255 범위에서는 컬러이미지였다면, 0~1로 변환하면서 GrayScale Image로 변했음을 볼 수 있다.
5. Build the model
Neural Network의 구조를 생각해보면 Layer로 이루어져있다. Deep Neural Network는 이러한 layer가 여러개 쌓여있는 구조이다. 앞으로 알아볼 것이지만, 모델에 따른 성능 비교도 해볼 것이다.
우선 여기선 Simple Layer 문제로 접근해보자.
"tf.keras.layers.Dense" 는 Dense Layer를 제공하고, train을 통해 parameter 업데이트가 된다.
model = tf.keras.Sequential([
    tf.keras.layers.Flatten(input_shape=(28, 28)),
    tf.keras.layers.Dense(128, activation='relu'),
    tf.keras.layers.Dense(10)
])"tf.keras.layers.Flatten"은 이미지의 2차원 데이터를 1차원 데이터로 변환해준다. (28*28 -> 1*784)
이 layer는 형변환만 해줄 뿐, 학습 파라미터를 가지고 있지 않다.
"tf.keras.layers.Dense"는 densely connected, or fully connected layer라고 불린다. 여기서 첫번째 layer는 128개 노드로 설정, 두번째 layer는 output이 10개의 카테고리에 대한 확률이기 때문에 10개 노드로 설정한다.
6. Compile the model
모델을 training 하기 전에, 몇 가지 세팅을 더 해준다.
Loss Function : Classification 문제의 경우 CrossEntropy, Regression 문제의 경우 MSE 등을 주로 사용한다.
Optimizer : 모델을 어떻게 업데이트 할 지 설정한다. 주로 Adam Optimizer를 사용한다.
Metrics : Training과 Test step을 모니터하기 위해 사용한다. 여기서는 accuracy를 사용해 모니터링 한다.
model.compile(optimizer='adam',
              loss=tf.keras.losses.SparseCategoricalCrossentropy(from_logits=True),
              metrics=['accuracy'])
7. Train the model
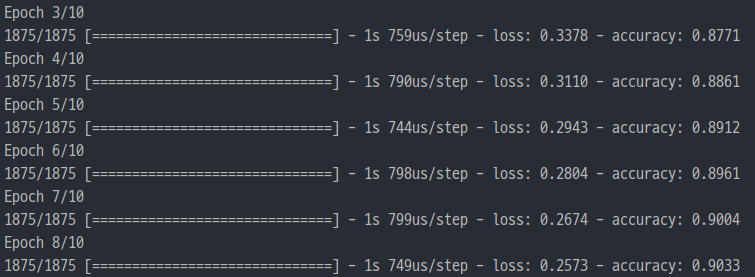
# training data를 입력한다.
# model.fit을 통해 training을 시작한다.
model.fit(train_images, train_labels, epochs=10)
epoch 설정을 통해 학습 횟수를 설정한다.
8. Evaluate accuracy
model.evaluate을 통해 test를 진행한다.
여기서 verbose는 함수 수행시 발생하는 상세한 정보들을 표준 출력으로 자세히 내보낼 것인지를 나타내는 것이다.
verbose는 0,1,2 중에서 선택한다.
0 : silent
1 : progress bar
2 : one line per epoch
# model.evaluate 을 통해 test dataset을 평가한다.
test_loss, test_acc = model.evaluate(test_images,  test_labels, verbose=2)

print('\nTest accuracy:', test_acc)
이렇게 간단하고 sequential하게 train을 진행해보았다.
차근차근 하면서 deep layer도 쌓고, 유명한 resnet, concatenation, batch norm 등을 API를 통하지 않고 직접 구현도 해볼 것이다. 하나씩 하나씩 해보자!
'Tensorflow > Tensorflow Tutorial' 카테고리의 다른 글
| [Tensorflow v.2] Tensor의 특정 기준에 해당하는 값 변경하기(tf.where 활용하기) (0) | 2022.08.09 |
|---|
